Sensory tubs

I am a huge fan of sensory tubs.  The first time I heard about sensory tubs was at my daughters very first Occupational Therapy session.  At first she would barely touch the tubs and never submerge her hands in it.  So we started making our own sensory tubs at home.  Now she actually uses the tubs as part of her play.  In fact when we were on holilday over Christmas both kids asked me for a bean tub – yes on holiday with new toys to play with and they actually asked for a sensory tub.

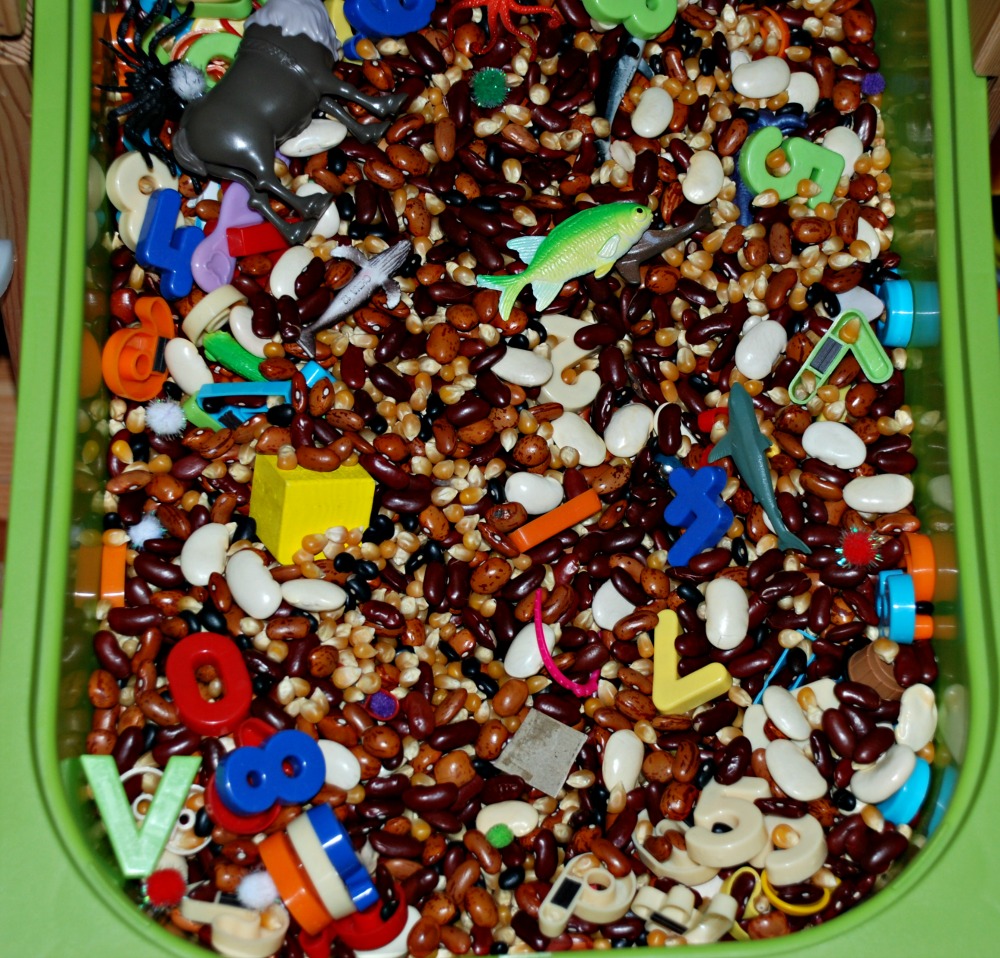
We have very simple sensory tubs and I tend to use the items in the tubs over and over again.  We often have themed tubs eg space or construction sensory activity but we also use them to hide letters and numbers in and the kids are free to use any of the sensory tub material in their imaginative play and their crafts.

Items we use in our sensory tubs

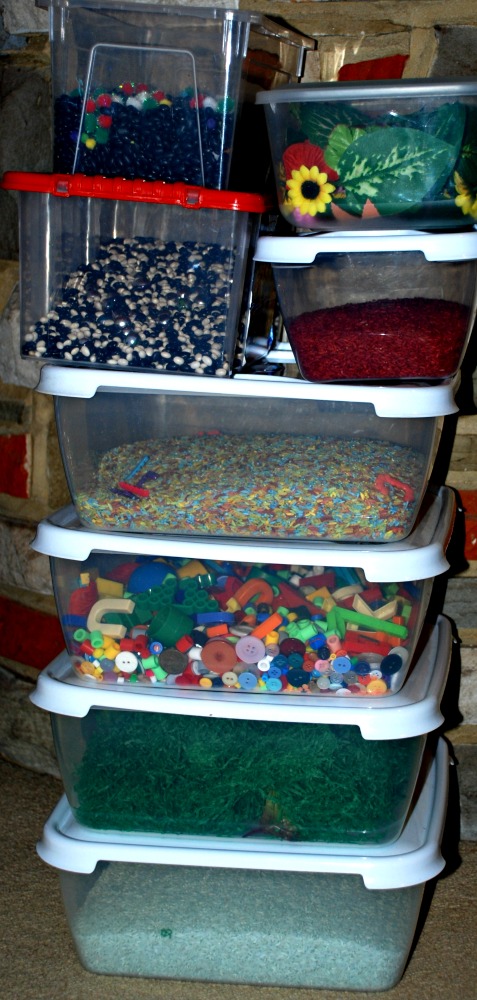
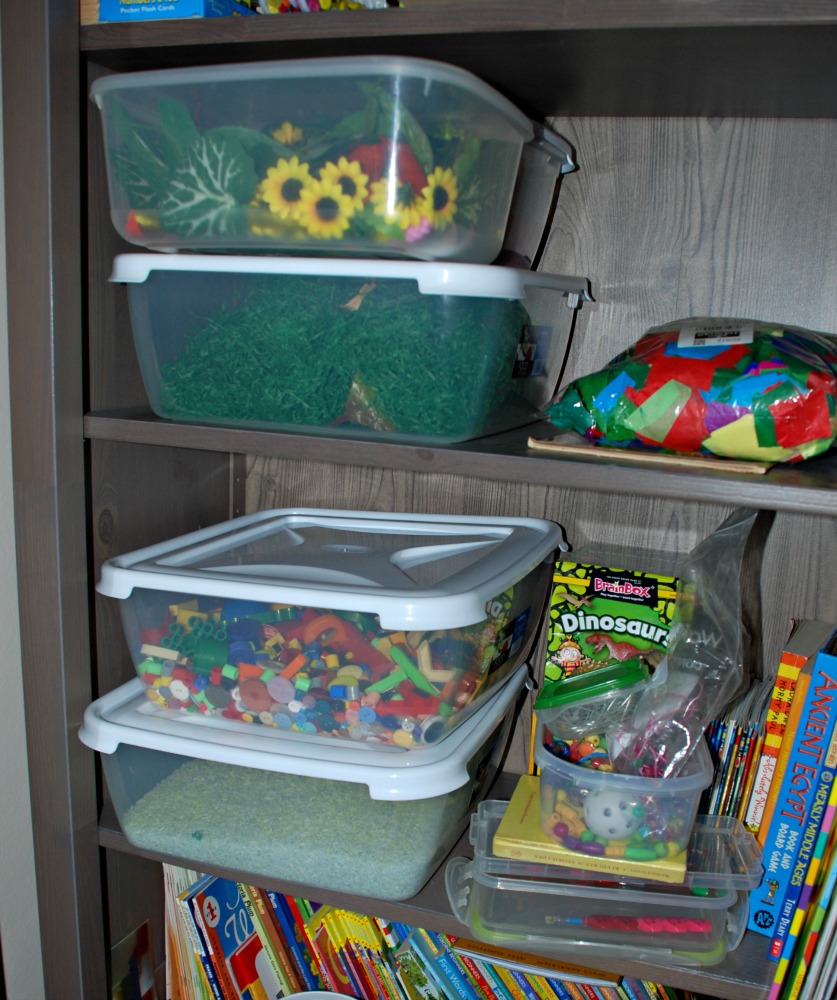
I normally have one tub out in our reception area and the others are normally packed away on the kids bookcase.  I have found that it is better to have tubs out where the kids can see them as it encourages them to use them more often.

Sensory tubs stored on our bookcase for easy access

We also have now moved the kids favourite tub (mixed beans) up to their bedroom.  This tub is constantly used.  As you can see from the picture the kids often hid their toy animals in the tub or use the beans as pretend food for their animals.

Mixed bean sensory tub

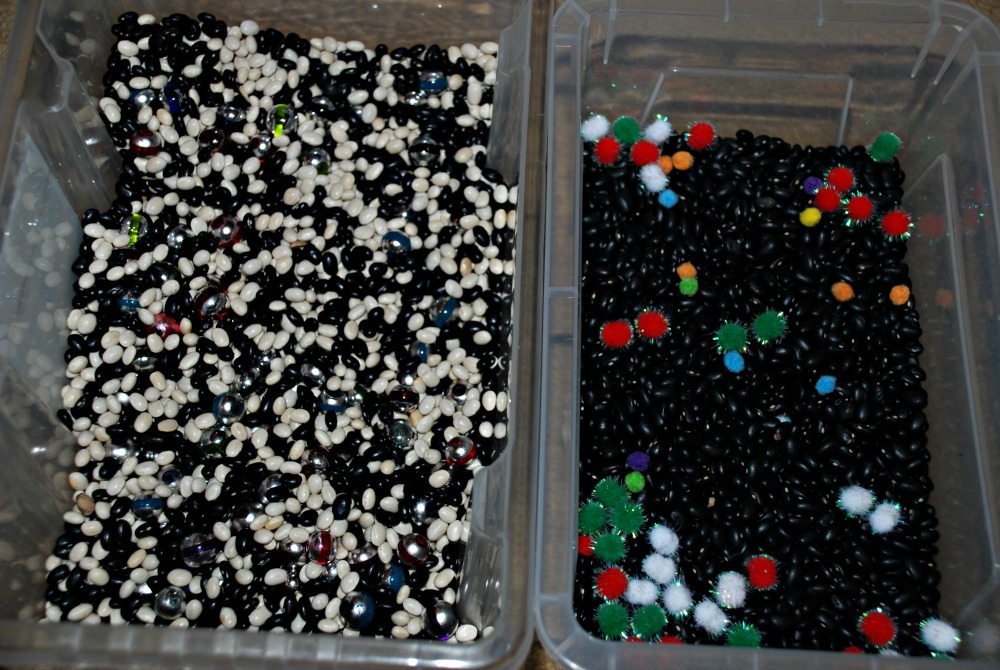
We have two mini bean tubs as well.  One is just black beans with some craft pom poms in.  And a friend gave us the black and white bean mini tub with craft beads in it.

Mini sensory tubs using black beans

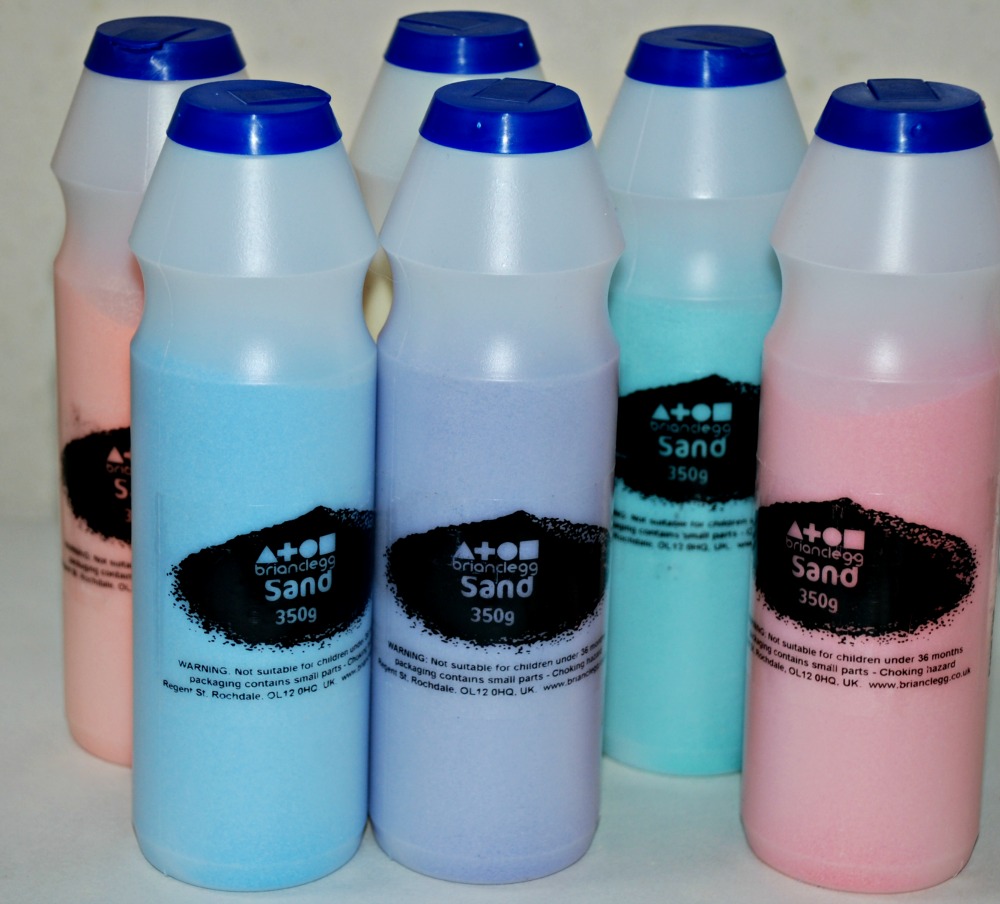
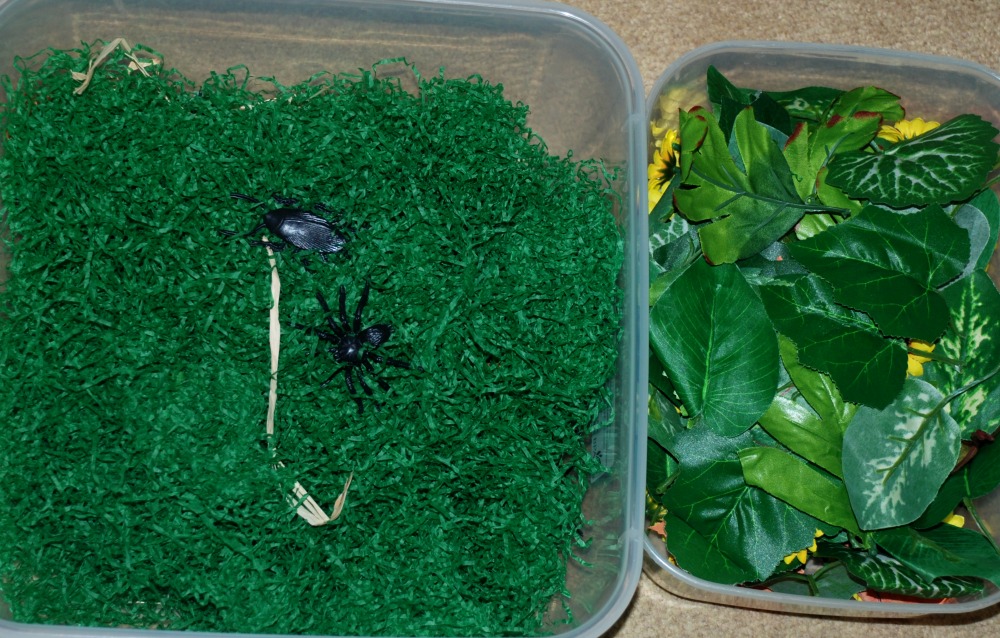
Other items that we have used – a number of coloured rice tubs – we have a green rice tub, a red rice tub and a rainbow rice tub.  We also have a tub filled with green shredded paper, this happens to be where the kids like hiding their toy insects.  And we have some craft leaves and a few craft flowers which we often include in our tubs (great for autumn or spring activities).

Sensory tubs - using green shredded paper as grass and craft leaves

So what is the purpose of sensory tubs – to get kids to play with tactile items in a non-threatening way.  To get them use to the feel of items so that over time they will eventually feel comfortable submerging their whole hand into the tub.  They can be simple and cheap or you can make them as expensive as you like.  Anything goes (well within reason as it needs to be child friendly).  It can be used as purely a sensory activity or it can be combined with learning activities like find the letter, find a word etc.

My kids love them and honestly some days I sit with the kids and submerge my hands in the tubs as the pressure of a tub fill of beans on your hands can be very relaxing after a busy day.

Posted in sensory play | Tagged , , , , | 2 Comments

Dinosaur Maths

It is no secret that our house is slightly dinosaur mad.  Most dinosaur related activities are big hits with both my kids so I thought it was time my youngest had a go at some dinosaur maths.

I printed out these free dinosaur footprints from Twinkl and cut them out.  The plan was to use them for some basic addition but before we started our sums my youngest had a go at placing the footprint in the correct order

Dinosaur footprint numberline

and he made sure that each footprint had the correct number of dinosaurs or eggs (speckled easter eggs make greater dinosaur eggs) on them.

Dinosaur footprints with dinosaur eggs added

(If your kids are still working on their number recognition a great activity would be to randomly call out the numbers on the footprints and get them to stand on the correct footprint or do something fun like give number 5 a T-Rex and give number 8 a Stegosaurus.)

Once he was satisfied we started playing around a bit.  First I placed one dinosaur on each footprint and he had to work out how many dinosaur eggs or baby dinosaurs he needed to add.  So for footprint 3 the sum ended up being 1+2 =3

Dinosaur addition set up

Dinosaur maths working out that 1 Dinosaur plus 2 dino eggs equals 3He did some using his dinosaur eggs and he did some using baby dinosaurs and he even repeated a few of them.

Dinosaur addition using baby dinosaurs

He thought this was great.  And ended up doing a lot of sums. We did stick to either adding 1, 2 or 3 at this stage.

Dinosaur maths 2 dinosaurs plus 3 eggs equals 5

At the end he even did some basic subtraction without realising it.  I told him that everyone could get 2 dinosaur eggs to eat.  So he gave his sister two eggs and then he worked out that 7-2 = 5 (once he took the 2 eggs away he only had 5 eggs left).  And 5-2 =3 and then lastly 3-2=1.

I have a feeling our Dinosaur maths is going to be ongoing next week.


Posted in foundation stage | Tagged , , , , , | 2 Comments

Maths learning aid for number bonds

This last week we have been playing around with making some Maths learning aids.  We wanted to do one which showed the link between number bonds to 10 and then 100 and 1000.  And we wanted to do something which also showed the link between number bonds to 10 and number bonds to 20.  Both are very simple home-made learning aids but they suit my daughter and the way she likes to learn.

Our first attempt was this one – we folded some coloured card as a 6 page accordion (check out this pin for some paper folding ideas).

Maths folding aid our first attempt

On the first page we wrote out the number bonds to 10.  We cut the first page into strips and on the 2nd page (so if you lifted up a strip from the first page you would see it) we wrote the same number bonds but multiplied by 10.  So if on the first page it said 1+9=10 on the 2nd page we would write 10 +90 =100.

This was okay but when my daughter then wanted to include 100’s (eg 100+900=1000) it just did not work like she wanted it to.

So we tried another version.  This time we used three pieces of different coloured card – roughly A5 size.  We stapled all three together and cut 11 strips down the side.

Maths folding aid cutting the strips

On the first page we wrote our Number bonds to 10.  Then on the 2nd page it was the same number bond but multiplied by 10 and on the last page it was multiplied by 100.

So 2+10 = 10 would then become 20 +80 = 100 and then 200+800 = 1000.

Maths folding aid for number bondsMy daughter was happy with this version and the way the sums all ended up one under the other.

Now we wanted to try and do one which showed a link between number bonds to 10 and number bonds to 20.  We tried a few versions but my daughter was adamant that there had to be flaps involved so in the end we came up with this.

Maths folding aid showing number bonds to 10 and 20

We started off by folding our card into three equal sections.  The middle 1/3 is the area on which the number bonds to 10 are written.  Then we folded the two outer section in half so that they created a flap.  And we cut the folds into strips so my daughter can lift up an individual strip to see what the number bond for 20 would be.

Maths learning aid for number bonds to 20This one is proving very popular with my daughter  as she was very confident and quick with the number bonds to 10 but she needed to think for her number bonds to 20.  Now that she is seeing a visual link between the numbers she seems to be much more confident and quick when I ask her.

Maths home-made learning aids for Number bonds as made by ofamilyblog

Posted in ks1 maths | Tagged , , , , , , | Leave a comment

Butterfly Cermaic flowerpots and Sharpies

I have seen lots of posts on Pinterest about using Sharpies on mugs and I have been dying to give it a go but I wanted to try something other than coffee mugs. (If you have not seen these stunning mugs do yourself a favour and search Pinterest for Sharpies and ceramics – wow there are some stunning ideas).

Anyway as luck would have it we were recently given 4 ceramic flowerpots from Baker Ross, which for me was a sign that we needed to give the whole Sharpies on ceramics a go.  Yes, yes it does not take much to get me or my kids to try a new craft idea……………

One of the things that I really liked about these flower pots is the picture is already on the pots so for younger kids they have a 3D outline to work with.

Butterfly ceramic flowerpot from Baker Ross

My daughter does not normally enjoy traditional colouring pages, I normally have to find pages that are a subject specific or find a unique way of doing the pages.  However she loved the idea of colouring the pots in.  She sat and did an entire pot in one go.

Butterfly ceramic flowerpots decorating them with Sharpies

She seemed to enjoy the challenge of colouring in a 3D object and at times she did go out of the lines, but by leaving the background until the end we found that she could colour over some of her “mistakes”.

Butterfly flowerpot using Sharpies to decorate them

As she progressed onto her 2nd pot she got more and more confident with the 3D colouring.  I love the final results.

Butterfly flowerpots decorated with Sharpies

And this weekend she gets to go to our local garden center to choose what she is going to put onto her flowerpots.

As my daughter has never worked on ceramics before we decided to do a little in-house experiment.  We have baked two of the flowerpots (as per all of the advice about using Sharpies on ceramics from Pinterest) and we have not baked the other two.  All four flowerpots are going to be on our windowsill in the kids play area and we are going to see how they last and compare what the differences are, over time, between the two sets of pots.

Posted in Art and Craft Ideas | Tagged , , , , , | 1 Comment

Sand Words

My kids love sand art but in the past we bought small sets of sand art and they used the coloured sand to decorate pictures.  I never realised you could just purchase the coloured sand in bottles – like this set of six – pastel coloured sand.

Sand from Baker Ross

I know with both my kiddies they learn best when they are physically doing an activity.  We have done word and letter mosaics (using beans and pasta) in the past so I thought why not try some sand words.  I started off by writing a few words on some paper for my youngest and then he took over.

Sand words - trace over the letters with glue first

He traced over the letters with his glue and then added his sand.

Sand art sight words

After doing two words he asked if I would write out ” I love you” and include a heart.  So of course I did and he made me this lovely picture

Sand words - I love you

He really got into it and asked me to write out a number of phrases for him.

Sand words - writing phrasesIt ended up being a fun way of him practicing his letter formation.  And the fact that the glue did not always trace over the words perfectly worked for him as he would tell me afterwards – the a is not supposed to have the line in it should be like this – and he would draw the a in the air for me.

Sand words - using sand art to practice our letter formation and sight words

His big sister also joined in the fun and made me a card and did a lovely flower.

Sand words

With my son he found it easier to pour the sand into a small cup before he sprinkled it onto his letters.  He found the bottle just a bit to heavy and large for him (my daughter managed fine with the bottle).

sand words - using a cup to sprinkle the sand onto the glue

Also in order to contain the sand we did all of our sand words and pictures on trays.  This definitely helps to contain the sand and make it easier to pour back into the cups and reuse the left over sand.

And with all the words that we ended up making we only used a small amount of the sand from the bottles, I think the sand in those 6 bottles is going to last us for a number of different art and learning projects.


You might also be interested in our Sand Easter eggs


Posted in Homeschooling | Tagged , , , , | 1 Comment