Compound Word Folder

We have been working a lot on spelling lately and as part of that we have been talking about compound words and how often when we spell larger words it is simply two smaller words put together.

We used the Twinkl Compound Word matching cards (free to download) a while ago – as a matching cards activity but I thought the word cards would also be great to use in a folder.

I started by folding some A4 card so that it had two flaps like the picture below.  [To start with you fold the card in half and then unfold it again.  Now you fold both outer edges so that the meet in the middle – at that first folded line.]

Folded card to make the compound word folderThen we cut out the compound word cards.  But the sections where it shows the two words being added together we cut those sections in half (well sort of in half just in front of where the plus sign is).

compound word cardsStick the two words on the outside flaps and the compound word on the inside.  When I glued the word with the plus sign on I did not glue behind the plus sign as it overlapped the edge of the card.  Below is what it looks like when the flaps are all closed.

Compound word folder

And when you open the flaps you use the full word (what it is when you combine to the two smaller words together).

Compound word folder made using Free Twinkl pages found on ofamilyblogReally simple and easy to make – just some folding, cutting and glueing and it is all done.

Compound word folders using Twinkl word cards made by ofamilyblog

Update – I have received a number of emails asking about the card that we used – it was just straight forward coloured card (A4) that we had in the art and craft cupboard.  Nothing fancy I promise.  Probably bought on a sale a while ago (I normally try to buy our card in bulk whenever there is a sale we use a fair bit).


Save

Posted in Folders /Lapbooks | Tagged , , , , , , | 2 Comments

Maths using snap cubes and scales

I think our snap cubes were one of the first items I bought when we decided to go down the homeschooling route, and they have proven to be an excellent investment in the kids education and my sanity.

We have used them in numerous learning activities over the years (old post – we love our snap cubes) but I thought I would share some of the ways we have been using them in the last couple of weeks.

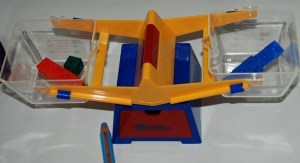
I like using our snap cubes on our small kitchen table.  I normally cover the table with some paper so that the kids can write out the sums as they figure them out. I have found having the whole table covered in paper as opposed to just giving them a piece of paper encourages them to “try out their sums” and not be so scared of making mistake and crossing them out – as there is lots of place to write and rewrite the sums.

snap cube set-up ideaWith my youngest we have been using this set up to work out basic sums.  He has been going through a phase where he is always checking with me if he has a sum correct.  In the middle of a conversation he will ask me “mummy is 2 +2 = 4 or is 10+1 = 11”.  Although his big sister mostly answers these questions for him I wanted to make sure he did some hands on figuring out for himself.  I wanted to make sure that he is not just memorizing answers but understand what it means (he has an excellent memory).

So we have done two different sums with him.  Firstly in the one bucket we will place two sets of cubes to represent a sum eg 2+2 or 3+4 etc then he figures out how many cubes he needs to place in the other bucket to “balance” his sum.

Snap cubes and the learning resources scale to balance our sums ofamilyblog

Using our Learning resources scale to make sure our snap cubes on either side are balanced

His sister started writing his sums out for him on the paper but he has now taken over doing that for himself.

Working out and writing out your own sums

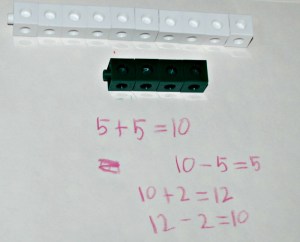
And the second type of sum we have done with him is where I place a number of cubes in the one bucket on the scale eg 10 and then he has to figure out which two other numbers will “balance 10” eg 5+5.

In the past we have used the snap cubes to represent the inverse relationship between addition and subtraction (something which we revisited again last week).  I am trying to get my daughter to double-check her subtraction sums by doing the inverse addition.

snap cubes to show relationship between addition and subtraction

We have also used them a lot with her sums where a number is missing.  Eg 12+ what number gives you 17.

And we have used them recently to expand some of her sums.

Snap cubes and learning resources scale to introduce the idea that two sums can be equal
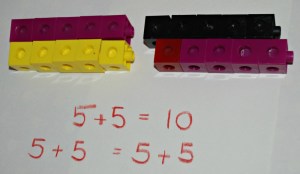
This is a concept which she has started asking me about but she was needing a visual example to help her process it properly.  She had sort of figured it out in her own head but was just not 100% sure.  Once we worked through some visual examples I think it sunk in a bit for her.  We started of by setting up the scales with a simple sum like 5+5=10.  So in the one bucket we had all 10 together and in the other bucket two groups of 5.  Then we broke the 10 down into different groups eg 8 +2 or 6+4 or 5+5 and we got our sums.  5+5=5+5 and 5+5=8+2 etc etc.  We will still need to practice this some more but I think the concept is there.

Snap cube maths on ofamilyblog

And another great thing about the snap cubes is while big sister is using them to do her Maths, little brother can still sit with her at the table and build – well he says it is a scarecrow.

snap cubes as building blocksThe learning resources snap cubes and the learning resources scales are items that I bought for my kids from Amazon here are affiliate links for the two items

Learning resources snap cubes set of 100

and Learning resources scale

Using our Learning resources snap cubes and scale in maths at home on ofamilyblog


Posted in Homeschooling | Tagged , , , , , | Leave a comment

Rush Hour Junior – a fantastic problem solving game for young kids

First let me state – this is not a paid for post and I have not been given this game to review.  I bought the Rush Hour Junior game (affiliate link) as a Christmas present for my 5-year-old son and it has been so popular with the whole family that I thought I would share my thoughts on the game.

The reason why I choose to buy this game in the first place is because we have a game called Camelot Junior which is hugely popular with the kids and in my opinion is an excellent logical thinking game for kids.  The kids have to set up the wooden blocks in the same order as depicated in the book and then they use the remaining blocks to form a link from the prince to the princess.  It starts off with some easy examples and then gets progressively harder. It is a brilliant problem solving game.  So when I was thinking about Christmas presents for the kids I knew I wanted another game that had a similar problem solving aspect to it as Camelot.

Playing Camelot Junior game

I read a number of reviews and I ended up choosing Rush Hour for a number of reasons.  Firstly it is a car game – which for a car mad little boy is always going to be a big plus.  But more importantly I liked the concept that you are given scenarios and the kids then need to figure out how they are going to get the Ice-cream truck free.  Again problem solving !!

The game has 4 different level and there are 10 scenarios for each level.  To start with the kids choose a card and they need to set up the board so that the cars on the board match the cars on the card.

Rush Hour game - setting up the board to match the challenge card

Then they have to move the cars so that the Ice-cream truck has a clear path to drive out the exit.  All the cars can only go forwards and backwards – they can not move sideways.

Rush Hour Junior game

One of the first things that this game taught my son is sometimes you need to move a vehicle in one direction so that it frees up a path for another vehicle and then you might need to move the first vehicle back again.  My 5-year-old is learning to think a couple of steps ahead while playing with cars.  Brilliant !! And yes as they progress the scenarios do become more complex and hence the solutions are not as straight forward.  But my son is already on level 3.  Granted he is a very determined 5-year-old and he does have a knack for puzzles and problem solving.

He loves it and I honestly do think it is a fantastic kids game to have in the house.

Posted in Homeschooling | Tagged , , , , , , | 2 Comments

Addition and subtraction with lego and a dice

My youngest is always full of questions – often the questions center around dinosaurs or animals but lately we have been having lots of chats about having two more or two less.  Often around food eg  Mom if I have 4 biscuits and you gave me two more than I would have 6 biscuits – and yes that probably is just my child wanting more biscuits but I am going with the thought that he is getting his head about the concept of adding and subtracting two.

So I thought it would be good to play a simple game with him.  I made him a very simple dice – I used the free Cube template from Twinkl and wrote on each different side of the dice the following  +1, -1, +2, -2, +0, -0.  Then I got our Lego number cards out (again a Twinkl download but from their Gold package – one which we have used a lot) and I also unpacked some of the Lego Duplo blocks for him.  I choose to use all the number cards up to 20 as my son sits and listens to his big sister doing her maths on a regular basis so he has no issue with the “bigger number” but you could also limit the number cards to 10 if you wanted.

The idea of the game was this – He would turn over a card to select his number and then roll the dice and based on what the dice said he would have to adjust his number eg 10 +2.  Some of the simple sums he knew already and he would shout out the answer and select a new card but some those that he did not know or was unsure of her would use his Lego to help him figure it out eg build a tower of 16 blocks and then take 2 away.

Lego cards and simple dice used to work out a simple subtraction sum on ofamilyblog

Addition and subtraction game using Twinkl lego number cards and a simple dice

And no big surprise big sister also joined in – okay so the sums where far to easy for her but she enjoyed taking turns and I think we are going to make her a different dice for tomorrow with larger sums on so that when she joins in she can have more challenging sums.

Twinkl lego cards and dice used in the addition and subtraction game on ofamilyblog

And the end result – both kids sat together and did maths for far longer than normal.

Practicing addition and subtraction using Twinkl number cards, Lego and a dice found on ofamilyblog

Posted in Homeschooling, ks1 maths | Tagged , , , , | 1 Comment

Tumbling monkey fun

I love the look of the  “Year of the Monkey” pages on Activity Village, they have some really cute pages.

As soon as I saw their tumbling monkey pages, they screamed fun learning activities so I printed and cut them out even before I had really decided what to do with them.  I was initially thinking of using the blank monkeys as a number bond revision type exercise.  The idea was that my daughter would need to link all the monkey’s with sums that came to the same answer eg the monkey’s with 15+5 and the one with 22-2 would have to be linked as they both equalled 20.

But as often happens in my house my daughter saw the blank monkeys and made her own counting in 3’s monkey group.  I loved this as multiples of 3’s is still something that she is not totally comfortable with yet, so a great way for her to practice – she went all the way up to 30 before she ran out of space on her board.

Tumbling monkeys used to practice counting in 3'sI also downloaded the tumbling alphabet monkeys.  I initially thought it might be fun to have a long tumbling alphabet monkey but my son and I actually ended up using the monkeys to create words.  He started doing basic CVC words and hung them on a toy tree that we have.

Tumbling monkeys used to spell basic CVC words

And he also played around with the monkeys on a tray

Using monkeys to practice CVC words

Monkeys all linked together to spell bedHe was having so much fun with his monkeys that without even realising he started trying to spell longer words (sorry not the best photos as I was trying not to disturb him)

Monkey spelling using Activity village cut-outsAnd he continued trying to spell bigger and bigger words and then tried to make up a few of his own words.

Tumbling monkey nonsense words

All in all this ended up being one of the longest sessions that my son has sat working on words.  He was totally happy using the monkeys to try and spell words.

So sometimes downloading and cutting out resources before you actually know what you are going to use them for, can be a good thing !!

Tumbling Monkey counting and spelling using Activity Village pages found on ofamilyblog

When I initially wrote this post all of the Tumbling monkey pages were FREE to download but Activity Village have since changed the structure of their website and these pages are now membership only pages


Save

Posted in Homeschooling | Tagged , , , , , | Leave a comment