Stone Age to Bronze Age

Pink is still talking about the Stone Age people and how they lived in caves and needed fire to survive and is very keen to know what happened next.  In her words “mommy surely they did not go from using fire for everything to having stoves like we do, there must be something else that happened.”  So I wanted to encourage her thinking but I did not want to overwhelm her with too much detail as she is 6 years old.

I printed out the stunning World history timeline from Twinkl (platinum package).  Yes I know I have been using the Twinkl resources a lot lately but honestly this is one of the nicest resources I have seen.  It really is worth having a look at.  I know we are going to be using this a lot in the coming YEARS.  And yes it does take some cutting and pasting to put it all together but I honestly feel it was worth it.

timeline

Pink and I laid the timeline out on our lounge floor and we spoke about how it has taken many years for the progression from the stone age to us using our stove to cook.  I pointed out a few highlights briefly and we even spoke about areas that she would like to learn more about (the Egyptians and the vikings seem to appeal to her).

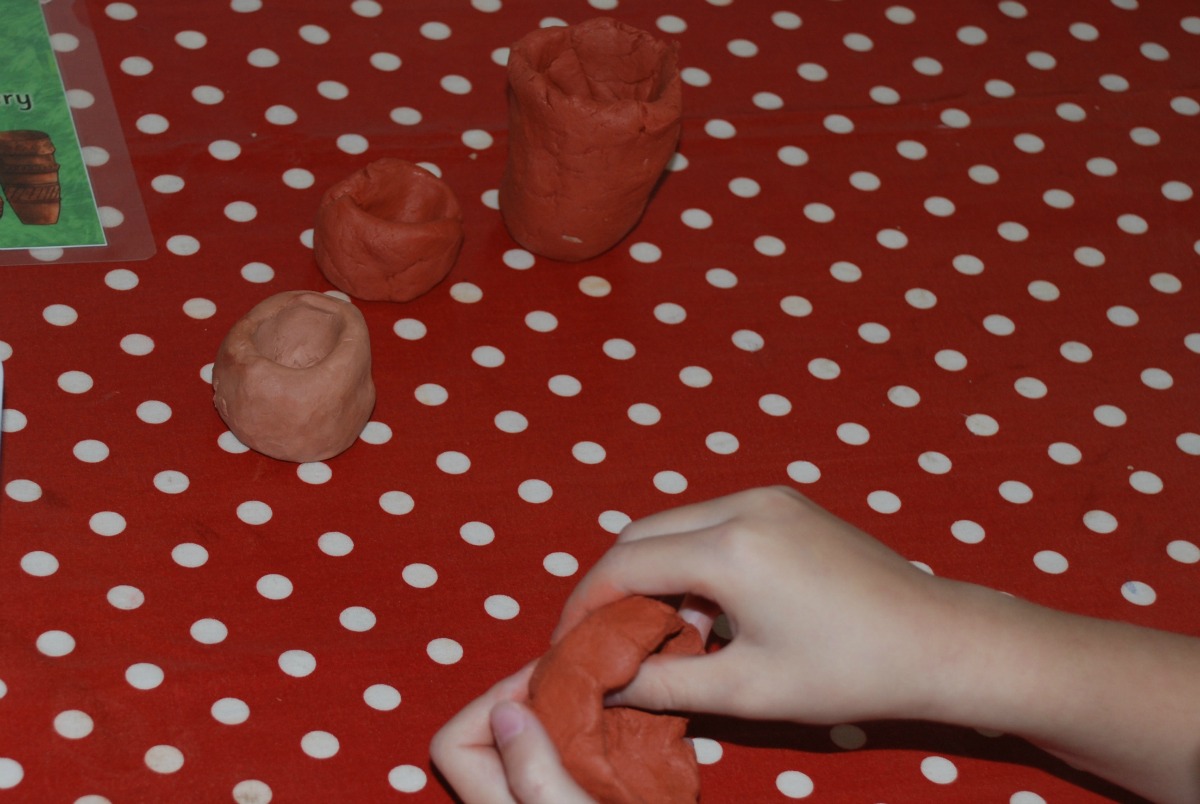
The following day after reading her book  Archaeologists Dig for Clues (thankyou to my friend who recommended this lovely book).   We got out some of our air drying clay and made some of our own pots and items that we thought could be similar to what they could find when they excavated a site.  Both kids loved this although Blue did not actually make anything he just played with the clay.  We used some toothpicks to make patterns on the clay pots.

clay pots

clay pots 1

While we made our pots I talked about how people started using pottery to help them with their day-to-day living and how they started building their own houses.    We had a look at this lovely Bronze Age display poster (Platinum package on Twinkl).

OLYMPUS DIGITAL CAMERA

We had a look at our house and thought about the modern items that we use and how it makes our life easier and how would it be if we lived in a simpler house with fewer items, no electricity, no TV, stove or hot water – my little girl did not like this she loves her warm baths and her comfy bed.

Pink then asked if we could make our own bronze age house.  We made our basic structure using some of the modelling clay as a base and some lolly sticks as the walls.

bronze age houseBuilding the house actually became a wonderful exercise this week as I had no idea how to do the roof and as a result we have ended up making a  number of different versions and had some great fun in the process.

Our first idea was to use a basic cardboard cone shape and then Pink used her tissue paper to cover it (we cut the tissue paper into long strips).

bronze age house 1Bronze age house 2I also tried to use the card board to make a frame for the kids to weave the tissue paper through – but this was not that successful.  So we then tried to glue some of our lolly sticks to a thick cardboard circle to make the frame for the roof – this was much better.

bronze age house 3We then weaved our strips of yellow tissue paper through the frame.

bronaze age house 4

Pink is now very excited to learn about the Egyptians but Blue wants to do a dinosaur dig so think we might do some digging for dinosaurs next week while I plan our Egyptian activities.

Update – here is the link for the air drying clay that we used

UK readers – Das Terracotta modelling Material air drying clay 485g Net 500g

US readers – Fila Das Air Drying Clay Craft Modelling Clay , Terracotta 500G

Save

Posted in History, Homeschooling | Tagged , , , , , , , | 3 Comments

Night Monkey Day monkey

If you read my blog on a regular basis you probably know by now that we love using our favourite story books as springboards for learning.  We have had Night Monkey Day Monkey by Julia Donaldson on our family bookshelf for s couple of years so it was only a matter of time before we did some school work based on the story.

We have read the story a lot but I always like to start off by re-reading the story and discussing what is going on.   After this we had a look at the powerpoint on how nocturnal animals adapt (Twinkl platinum) and spoke about which animals have extra good eyesight and sense of smell etc.

I had printed off and laminated the Free nocturnal word mats from Twinkl so Pink and I read the words together and spoke about a few of the words that she battled to read.

OLYMPUS DIGITAL CAMERA

Then we got out our Monkey pictures.  I hand drew a picture of a monkey based on the ones in the story and labelled one Day Monkey and one Night Monkey.

OLYMPUS DIGITAL CAMERA

Then Pink had a write the words around the monkey and of course she got to colour it in (Blue did the day monkey colouring for his big sister).

OLYMPUS DIGITAL CAMERA

And lastly we had some fun with our Night Monkey Day Monkey masks.  I found this FREE monkey mask template on Craft Jr website.  Blue wore the Day monkey mask and he had to find our Day toy animals while Pink wore the Night monkey mask and she had to collect our toy night animals.  They both thought this was great fun.

OLYMPUS DIGITAL CAMERA

OLYMPUS DIGITAL CAMERA

Don’t forget to check out some of the great posts on the weekly homeschool link up


Posted in Art and Craft Ideas, Book Ideas, Homeschooling | Tagged , , , , , , | 1 Comment

Rockets with straws

I was getting all geared up to make some rockets with my little boy.  I collected a bunch of great goodies all ready but my little man just wanted to build paper planes.  The two older boys next door to us are out in their garden most afternoons flying their paper planes and they very kindly made some for my little man and soon the boys created a game flying the planes over the garden wall into each others garden.

My little man desperately wanted a paper rocket but on a quick search of the internet I could not find a paper plane rocket template.  The first interesting rocket I did find was by LearnLove Create – rocket craft.  This was great at distracting Blue during one of our Maths lessons he coloured it in and after I helped with some of the cutting he stuck it all nicely down.

OLYMPUS DIGITAL CAMERA

OLYMPUS DIGITAL CAMERA

They also have a great looking Astronaut which we have printed.

However Blue really wanted a rocket like the paper planes, thank goodness for Mr Maker (CBeebies program we love) who came to the rescue.  He had a great idea where he made a paper rocket with paper and glue.  It is very simple and after I made a template for them –  Pink took over tracing, cutting and sticking rockets.

OLYMPUS DIGITAL CAMERA

You need to trace the identical shape onto two pieces of paper (or just fold your paper) and cut and stick the sides together.  You can use paper and glue for this but I must admit I found that they worked better if we used some scotch tape around the edges (you need to make sure that the edges are properly sealed).  Leave a gap at the bottom of the rocket for the straw to fit in and you are all set. After making a bunch of these in different shapes Pink learnt that the bigger ones do not work as nicely and the gap for the straw must not be too big either.

OLYMPUS DIGITAL CAMERA

Pink even tried to make a butterfly but she made it a bit big and it did not fly as nicely.

And yes the homeschooling mom in me did suggest we make some words as well. And it actually turned into a fun word game.

OLYMPUS DIGITAL CAMERA

And all the goodies that I thought we could use to build our rocket – they are sitting on a corner of our kichen table waiting.

Posted in Art and Craft Ideas, Homeschooling | Tagged , , , , , | Leave a comment

Numbers and number bonds without writing

I have to admit I love worksheets.  I love printing off a page and getting Pink to complete it and then being able to file it away as proof that we have done something.  But I also have to admit that Pink only likes doing one or two pages tops before she gets frustrated.  Pink has a great pencil grip and is forming her letters nicely but her hand gets tired very quickly so she gets frustrated.  She wants to learn but she gets despondent when her hands gets tired and she still has some answers to write down and then she will often just give up and walk away.

So this year we are going to be doing lots of fun activities and games to help strengthen her hands and her shoulders but in the mean time I still want to match her thirst for learning but I want to avoid at least some of the frustration.  As a homeschooling mom I am thankful that I can tailor my childs learning to her strengthens and work on her weaker points in fun ways.

Pink has been coming to me the last 2 weeks asking me questions about adding bigger numbers and as she comes with the questions I answer them for her.  But with this renewed enthusiasm for Maths I wanted to revise her number bonds up to 10 just to make sure our basics where solid.

We started off by revisiting her butterfly number bond cards (free on Twinkl).  She loves these I have already been tasked with finding her some more for her bigger numbers.

OLYMPUS DIGITAL CAMERA

We also did some Math cards buried in a big plastic tub of fruit loops.  We do not normally have fruit loops in the house so the fact that she could do some Maths cards while munching on some fruit loops went down very well.  The heart maths cards were done by 3 Dinosaurs and are free to download at Homeschool Deals.

OLYMPUS DIGITAL CAMERAOLYMPUS DIGITAL CAMERA

We then did some cutting and pasting of our numbers.  I made some basic number Mats for Blue to do while his sister was doing her maths however as often happens in our house everyone wants to join in.  So I added some sum tabs for Pink to cut and stick on her numbers.

OLYMPUS DIGITAL CAMERAOLYMPUS DIGITAL CAMERAOLYMPUS DIGITAL CAMERA

She really does prefer doing her work like this so going to make some more pages like these for her bigger numbers this week.

Here are the Number cut and past pages

Number cut and paste

Posted in free printable / worksheet, Homeschooling, ks1 maths | Tagged , , , , , , | Leave a comment

Space here we come

My kids have never been interested in Space until a few weeks ago when they watched this You-Tube clip  Space shuttle launch .   Now my little boy is obsessed.  He walks around the house doing a countdown and they saying “we have lift off” and makes the sound of the space shuttle taking off.

So after being house bound (sick daughter) I decided we should take the space obsession a bit further and we made a space play box/ sensory box for him.  I started off by covering an old amazon box with some kitchen foil and then filled it with some black beans,  some silver glitter balls, our space play dough and the Space Safari Toob wich I recently bought from Amazon.  Pink actually went and fetched the egg carton from her art trolley (have I mentioned lately how much I am loving the art trolley – it really encourages the kids to be creative) and added that herself.

OLYMPUS DIGITAL CAMERAOLYMPUS DIGITAL CAMERA

The kids love it.  And I have to admit it has been a nice change from the normal cars and trucks in our house.

The space play dough is home-made using the no-cook play dough recipe from Imagination Tree.  It really is very quick and easy.  I added blue food colouring to my mixture and some silver glitter and it ended up with a great Bluey/ gray colour.  We will definitely be using this recipe again.

Naturally I could not resist doing a space picture with the kids.  We used some sponges and painted an A3 size paper with blue / black and dark purple to get a night sky effect, while the paint was still wet we added some silver glitter for the stars and we left the paper to dry over night.  I made the kids some rocket shapes, I made them slightly different as I wanted to ensure that Blue did not get too frustrated with his but I also wanted Pink to think about how her shapes would make up the space shuttle.  Pink cut her shapes and I number a few of them in 10’s.

OLYMPUS DIGITAL CAMERA

I helped Blue with his cutting  and I included outlines on his template so he knew where to stick his shapes.

OLYMPUS DIGITAL CAMERABlues finished picture

OLYMPUS DIGITAL CAMERA

And Pink’s finished picture

OLYMPUS DIGITAL CAMERA

So next on our list –  to make our very own space rockets, we have made a few already but none manage to last very long with my boy.  And Pink wants to make some planets.


I am loving the weekly link-up of Home Ed related posts at Adventures in Homeschool, even if you do not Home Ed there are posts with great ideas of things to your kids after school, it is worth popping over and checking out.

Posted in Art and Craft Ideas, Homeschooling, sensory play | Tagged , , , , , , | 8 Comments